Wednesday, March 28, 2012

orange almond scones


A scone and tea at half past three, makes the day a little bit brighter. - Still Game

I love scones.  I love buying scones, I love making scones, I love eating scones.  I love savory scones and sweet scones.  I love scones with butter and I love scones with jam.  

These scones are an adaptation of the cranberry scones I made last year.  


Orange Almond Scones
adapted from the sweet hearth

1/2 cup milk
1/2 cup plain yogurt
1 cup all-purpose flour
1 cup white whole wheat flour
1/2 cup granulated sugar 
2 tsp baking powder
1/4 tsp baking soda
1/2 tsp salt
1 Tb fresh orange zest
8 Tb unsalted butter, frozen & grated & frozen again
1/2 cup slivered almonds
Milk to brush tops of scones
Whisk together the milk & yogurt until uniform, then place bowl in the fridge.

Whisk together flours, sugar, baking powder, baking soda, salt, zest and almonds. Then, using your fingers, lightly toss in the butter till it’s evenly dispersed.  Add the milk mixture to the flour mixture & stir till it’s just combined.  Then, pull it together into a ball, knead it a couple times, & roll it out on a good & floured surface until it measures about one square foot, adding flour as needed.  
Using a bench scraper or a good spatula, fold the dough onto itself in thirds as you do before placing a letter in an envelope.  Then fold that rectangle into thirds again, creating a rough square.  Place the square back into the bowl & refrigerate for about 15 minutes.  Don’t clean up your work surface just yet.

After it’s chilled, take the dough square, & roll it out again into another one square foot, still using flour as needed.  

Using that bench scraper or good spatula, roll the dough up, jelly-roll-style & flip it seam-side-down.  Use your hands to coerce the log into becoming a rough 12 x 4 inch rectangle with a relatively flat top.
Then, with a sharp knife, cut the rectangle into four equal 3 x 4 inch small rectangles. & cut each of those on the diagonal to end up with eight triangles.

Transfer them to a lined baking sheet, brush the tops with milk and bake in a preheated 425 degree oven for about 15-20 minutes until the tops are golden.


Monday, March 26, 2012

rocky road cookies

 
I made this cookie batter with chocolate chips and pretzels last week and they were to die for!  Sadly I have no pictures, only the fondest of memories of how delicious they were, but it did leave me with ideas on what else I could bake into this amazing dough.

Again with the marshmallows, I feel like I'll never use them all up!  So these road cookies were born out of the same desire as the rice krispies I've baked so many times lately... I am still not even half way through the collection, but I'm getting there.


 Combine butter white sugar and brown sugar.


Cream together and then add egg and vanilla and combine.
 

Add flour baking soda and salt and combine.


Add chocolate chips and nuts.

Note: DO NOT ADD THE MARSHMALLOWS! Ignore the picture, just trust me.
 

Mix it all together and form into balls.


Bake for 8 minutes at 350.


This is why you should not add the marshmallows to the dough.  They melted and basically burnt onto the pan.  What a disaster it was to get them off the cookie sheets... such a disaster that this is the crumbly mess (of deliciousness mind you, but crumbly mess none the less) of cookies with the marshmallows baked right in.
 

Instead, mix the chocolate chips and nuts into the dough, form into balls and then place 2-3 marshmallows on top of each cookie.  That way they bake on top of the cookie and don't end up in a crumbly disaster (of deliciousness) like the above picture.

Rocky Road Cookies
 from back to basics

3/4 cup white sugar
3/4 cup light brown sugar
1 cup unsalted butter, softened
1 egg
1 tsp vanilla
2 1/4 cup all purpose flour
1 tsp baking soda
1/4 tsp salt
1 cup chocolate chips
1 cup slivered almonds
about 1 cup of mini marshmallows, maybe a bit less

Cream together the sugars and butter until light and fluffy. 

Add the egg and vanilla and mix into creamed mixture.

Add the flour, baking soda and salt and combine with creamed dough.

Add chocolate chips and nuts, roll into balls and then place on baking sheet.  Add 2-3 marshmallows to the top of each ball and then bake for 8-10 minutes at 350.

Note: It depends on your oven but I have never baked them more than 8 minutes.


Maybe next time I'll use festive Easter M&M's instead of rocky road...  Just a though.

Happy baking!

Saturday, March 24, 2012

chocolate flower pots

It's spring and it's making me so happy.  Cupcakes, bright colours and sprinkles also make me happy, so naturally I figured out a way to combine them all.

I just got these silicone flower pot cupcake holders from the christmas tree store while I was visiting my mom and sister in the states.  Super cute. 

Side note: That store is awesome, I wish we had them in Canada.


I also got to try out a recipe I found that makes 4 cupcakes.  So convenient because I really didn't want to eat the cupcakes as much as just decorate them, so there was no waste.  Realistically though I can't imagine chocolate cupcakes would ever go to waste around here, but still.


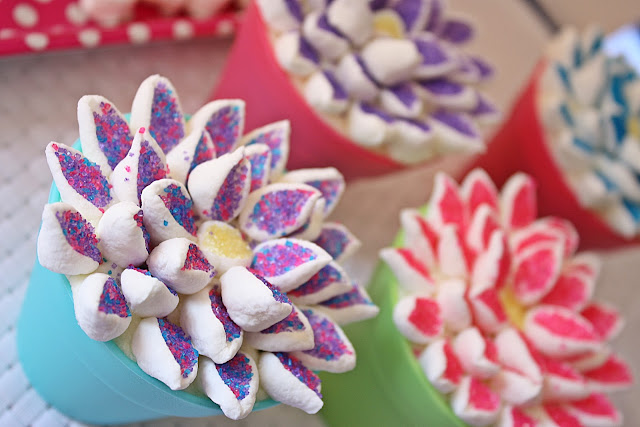
One of the things we did for my bachelorette party was decorate cupcakes with marshmallows to look like flowers.  (We also decorated phallic shaped cookies, but that's not really appropriate for this blog, so we'll just stick with the flower cupcakes.)

Side note: I'm a little bit closer now to diminishing my marshmallow stock pile!


It's so super easy.  All you need is sprinkles and mini marshmallows.  Cut the marshmallows diagonally and dip the sticky side in the sprinkles.  That's it.  


4 Chocolate Cupcakes

1/3 cup milk
1/4 teaspoon white vinegar
1/3 cup flour
4 teaspoons cocoa powder
1/4 teaspoon baking soda
1/4teaspoon baking powder
4 teaspoons canola oil
1/4 teaspoon vanilla
1/4 cup brown sugar

Preheat the oven to 350°. Line 4 cups of a muffin tin with paper liners.

Pour the milk into a small bowl. Add the vinegar and let sit while you prepare the rest of the ingredients.

Sift together the flour, cocoa powder, baking soda, and baking powder in a small bowl.

In another bowl, whisk together the canola oil, vanilla and brown sugar. Add the dry ingredients to the oil and brown sugar mixture in two batches, alternating with the milk mixture.

Divide the batter between the 4 muffin cups and bake for 15-18 minutes, or until a toothpick inserted
comes out clean.


Welcome back spring.

Friday, March 23, 2012

pizza dough by hand


You'd think working at a pizza store right now that I'd be tired of pizza.  Not so much.  I've been meaning to make my own dough for a while now, but because I don't have my mixer these days (I'm spoiled), I just haven't gotten around to it.  I'm glad I finally decided to.

Pizza Dough By Hand

1 package active dry yeast
1 cup warm water (110 degrees F.)
2 1/2 to 3 cups flour plus more if necessary
1 1/2 teaspoons salt
1 1/2 tablespoons extra-virgin olive oil

In a large bowl, combine yeast with water, olive oil, salt and stir well to proof. After 5 minutes, add half of the flour and mix well to thoroughly incorporate. Add all remaining flour except 1/2 cup and mix well with your hands. Transfer dough to a lightly floured work surface and knead dough for at least 5 and up to 7 minutes, adding enough additional flour as necessary to form a smooth and elastic dough. Dough should not be sticky. Transfer dough to a lightly oiled 2 or 3 quart bowl and turn to coat with oil. Cover with a damp towel and let rise in a warm place until doubled in size, usually at least 1 hour. 

Preheat oven to 500 degrees F. and if you have one, place a pizza stone on the bottom rack of the oven.
Divide dough into 2 portions (for 2 (12-inch) pizzas) and form into balls. Place on a lightly oiled baking sheet and cover with a damp towel. Let rest for 15 minutes, then transfer to a lightly floured surface, shape as desired and roll out to a thickness of 1/4-inch. Transfer dough to a pizza peel and top with toppings of choice. Transfer to the preheated pizza stone and bake until crispy and golden brown, usually 12 to 18 minutes (depending on the toppings). Remove from the oven with a metal peel or spatula and serve immediately.


What I topped this pizza with was garlic and olive oil as the base, tomatoes, red onions, basil, mozzarella cheese and a bit of italian seasoning. 

It was delicious.  Even Josh who isn't a big fan of tomatoes approved. 

Thursday, March 22, 2012

cake batter rice krispie squares


I've made a lot of rice krispie squares lately.  It's pretty random because they're really not something I would choose to make a lot of, but we've had so many marshmallows and rice krispies around that making them into squares was just a logical decision.

Side note: the reason we had so many marshmallows and rice krispies around was because at Christmas I decided I was going to make a rice krispie house instead of a gingerbread house.  It was an epic fail and because of that there were a lot of leftover ingredients.  I've long since finished using the festive version of the cereal and original bags of marshmallows, but when I had to make Shane his birthday cake, I had to stock up again... so these were born out of a desire to use up the new collection.

I've heard of using cake mix to add a distinct flavour in the treats before, and I though it was a good time to try it out for myself.  I won't lie, I didn't really taste the cake in them (and neither did one of my sisters or my mother in law) but they were still delicious.  Plus, you really can't go wrong with sprinkles.


Sprinkles.


More sprinkles.


Cake Batter Rice Krispie Squares

3 tablespoons butter
1 10-ounce bag of mini marshmallows
1/4 cup yellow cake mix
6 cups rice krispies cereal
1 1.75-ounce container of sprinkles

Melt butter in a large saucepan over low heat and add marshmallows. Stir until they begin to melt, adding in cake mix one spoonful at a time so its combined. Stir in cereal so it is completely coated with marshmallow mixture. Sprinkle in half of the sprinkles and mix. Press into a baking dish (any size will do) and top with remaining sprinkles. Let sit for about 30 minutes before cutting. I find spraying a knife with nonstick spray helps to cut them.

 Note: I didn't use a container of sprinkles, I just used a few tablespoons of what I had on hand.

Wednesday, March 21, 2012

angel food cake with lemon curd and mascarpone cream


It's March right?  I mean, it sure feels like summer, but it's March... right? 

Josh and I were at the grocery store the other day, and when I saw the cover of the newest Canadian Living Magazine, I fell in love.  To jump ahead a bit, after tasting this... absolutely in love.  But more on that later.

My original plan was to buy an angel food cake mix.  I thought I'd save time that way because I had a few other things I wanted to bake today, but apparently the grocery store didn't agree with that plan.  What grocery store doesn't have an angel food cake mix?  So instead I bought a dozen eggs and 11 later the cake was on it's way.  

 I hit a road block when I realized we didn't have tube pan, but a bundt pan.  Completely different things, but I had a back up plan if I couldn't get it out of the bundt pan.  Thankfully it all turned out beautifully.


 Next step was the lemon curd, which I've never made before.  I should have cooked it a bit longer and let it thicken up more, but despite it being a bit runnier then it should have been, it did not interfere with the amazing lemon flavour. 


The icing on this cake wasn't icing at all but mascarpone cream.  I'm running out of words with this one.  The more I talk about it the more I want to eat more.  
  

It was absolutely wonderful and delicious and fresh, and worth the $3.99 I spent on the magazine.  

Angel Food Cake with Lemon Curd and Mascarpone Cream

Angel Food Cake
 1-1/4 cups (300 mL) sifted cake-and-pastry flour 
1-1/4 cups (300 mL) granulated sugar 
1-1/2 cups (375 mL) egg whites, (10 to 12) 
1 tbsp (15 mL) lemon juice 
1 tsp (5 mL) cream of tartar 
1/2 tsp (2 mL) salt 
1/2 tsp (2 mL) vanilla 
1 cup (250 mL) quartered hulled strawberries 

Lemon Curd 
4 egg yolks 
1/2 cup (125 mL) granulated sugar 
1 tbsp (15 mL) finely grated lemon zest 
1/3 cup (75 mL) lemon juice 
1/3 cup (75 mL) cold butter, cubed 

Mascarpone Cream 
4 oz (113 g) mascarpone cheese, at room temperature 
1/2 cup (125 mL) whipping cream, (35%) 
1 tbsp (15 mL) icing sugar 
1/2 tsp (2 mL) vanilla

Angel Food Cake:  In small bowl, sift flour with 1/2 cup of the sugar; sift into separate bowl.

In large bowl, beat egg whites until foamy; beat in lemon juice, cream of tartar and salt until soft peaks form. Beat in remaining sugar, 2 tbsp at a time, until stiff glossy peaks form.

One-quarter at a time, sift flour mixture over top and fold in until blended. Fold in vanilla. Scrape into ungreased 10-inch (4 L) tube pan. Run spatula through batter to eliminate any large air bubbles; smooth top.

Bake in 350ºF (180ºC) oven until cake springs back when lightly touched, 40 to 45 minutes. Turn pan upside down and let hang on legs attached to pan, or on bottle, until completely cooled. Remove from pan. (Make-ahead: Store in airtight container for up to 2 days.)

Lemon Curd: Meanwhile, in heatproof bowl, whisk egg yolks, sugar, lemon zest and lemon juice. Set over saucepan of simmering water; cook, stirring, until thick enough to coat back of spoon, 8 to 10 minutes.

Remove from heat. Stir in butter, 1 piece at a time, until smooth. Strain through fine sieve into airtight container. Place plastic wrap directly on surface. Refrigerate until thick enough to mound firmly on spoon, about 2 hours. (Make-ahead: Refrigerate for up to 4 days.)

Mascarpone Cream: Meanwhile, place mascarpone in bowl. In separate bowl, whip together cream, icing sugar and vanilla; fold into mascarpone. (Make-ahead: Cover and refrigerate for up to 24 hours.)

Slice cake in half horizontally. Evenly spread lemon curd over cut side of bottom half; top with remaining cake. Spread mascarpone cream over top. Garnish with strawberries.


Yep, in love. 

Monday, March 19, 2012

lemon graham cracker dessert

  
This is probably one of my favourite desserts ever.  We used to have it a lot growing up, and I have a lot of memories of being the one making it.  Not only is it a favourite, but it's super easy.  Graham crackers, lemon pie filling, whipped cream, a simple water icing and melted chocolate... layer it and you're done.  It's that easy. 


Graham cracker layer.


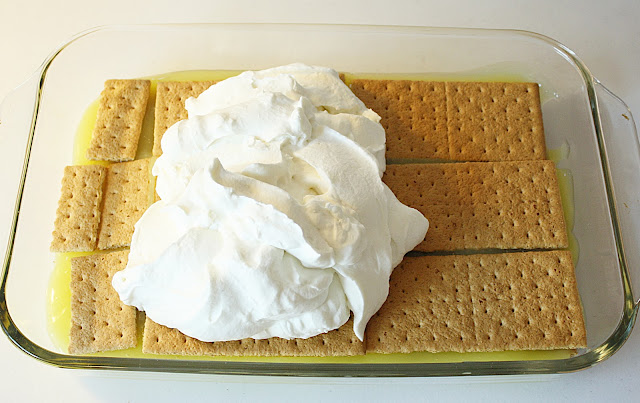
Add lemon pie filling.
 

Another layer of graham crackers.
 

Whipped cream layer.


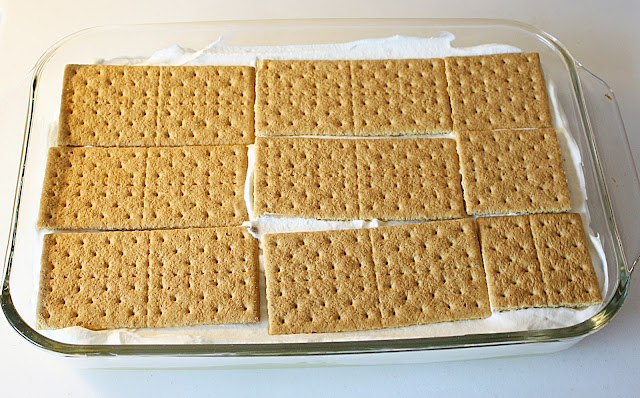
More graham crackers.


Spread a simple water and sugar icing over the crackers.
 
 
Lemon Graham Cracker Dessert 
from the big red book

1 box of graham crackers
1 box of prepared lemon pudding/pie filling
500ml sweetened whipped cream 
Enough icing that it adds a thin layer over top (icing sugar and water)
As much or as little chocolate of whatever kind you want, melted

You really can't screw this up.  In a 9x13 baking dish, start with a layer of graham crackers.  On the next layer, add the lemon filling.  It can be hot or cold, it really doesn't matter, and then more crackers.  Next add the 2 cups of already whipped sweetened cream and then more crackers.  Lastly spread the icing over the top and then drizzle the melted chocolate.  Refrigerate until cool and then dig in!

Notes:  We always used the lemon pudding and pie filling that you had to cook, not instant, but I'm sure instant would be fine.

We always used milk chocolate, but really, you can use whatever you want.


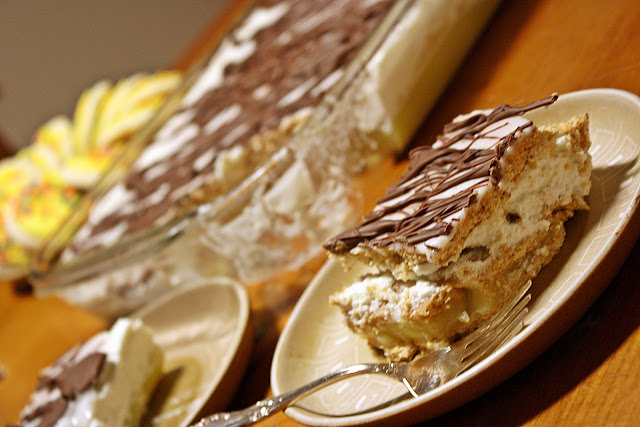
The best part about this dessert was that it always tasted better the longer it stayed in the fridge.  By the next day the graham crackers aren't cracker like anymore but soft.  So so delicious. 

Friday, March 9, 2012

chocolate cupcakes with coconut cream cheese frosting


My littlest sister Dawn had a baby!  And not just a baby, but a leap day baby!  There's really no better way to celebrate then with cupcakes.  Everything is said better when cupcakes are involved. 

 I get to meet her next week, and I'm so excited.  It will be worth the 10 hour drive with my own 31 week pregnant body... I just hope I can manage to not pee every half an hour like I usually do. 

Even though I wasn't there, and haven't met the little one yet, I felt inclined to bake my own celebration for the happy family.  I've had a thing for chocolate and coconut lately.

Classic (One-Bowl) Chocolate Cupcakes
Yield: 12 standard cupcakes

3/4 cup (90 grams/3 ounces) all-purpose flour
3/4 cup (150 grams/5 ounces) white sugar
1/4 cup (30 grams/1 ounce) dark cocoa powder
3/4 teaspoon (2.5 grams) baking soda
3/4 teaspoon (2.5 grams) baking powder
3/4 teaspoon (2.5 grams) cornstarch
1/2 teaspoon (3 grams) salt
1/3 cup (70 mL) buttermilk
1/4 cup (60 mL) brewed coffee or espresso, hot
3 tablespoons (45 mL) vegetable oil
1 egg, room temperature
1 1/2 teaspoons (7.5 mL) pure vanilla extract

1. Preheat oven to 350° F and line a muffin/cupcake pan with your favourite cupcake liners.
2. In the bowl of electric mixer fitted with the paddle attachment, sift all dry ingredients.
3. Add all remaining ingredients to bowl with the dry ingredients and mix for 2 minutes on medium speed (you may need the plastic splashguard that comes with mixer) and pour into prepared cupcake pan until 2/3 full (or just less).
*Batter will be liquidy, and cupcakes will rise.
4. Bake for 15-17 minutes, or until toothpick or skewer comes out with a few crumbs. Try not to over bake. Carefully remove cupcakes from the pan immediately (it’s hot!), and place them on a wire rack until completely cool.

Coconut Cream Cheese Frosting
from back to basics

8 oz cream cheese, room temperature
1/2 cup butter, room temperature
3 cups sifted icing sugar
1/4 cup of sweetened desiccated coconut plus more for dipping

In a mixer fitted with the paddle attachment, cream together the cream cheese and butter.  Add the icing sugar a bit at a time until until icing is smooth, and then add the 1/4 cup of coconut.

Ice the cooled cupcakes with the cream cheese frosting and then dip the tops in more of the sweetened coconut.


It was a great solo celebration, and I just can't wait till I get to meet the baby and celebrate for real with the happy family!

Congratulations Dawn and Steve!